Front wheel wells with MLV
On my last post about different noise levels on different road surfaces I had this idea to apply MLV on the front wheel wells on the Ampera. Turns out after searching a bit on the Internet I found more people who had the same idea and the results where promising.
I had never removed the wheel wells liners, the tech docs were not clear on what was behind them and only really saw a video on YouTube that didn't really show much.
My initial idea was to simply add MLV on top of the wheel well liner and use the screws and plastic clips to keep it in place, but that turned out not to be.
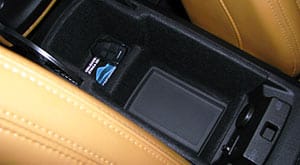
So after removing the liners this was what I was greeted with.


Everything is very accessible, and unlike with the Citroen C6 all the cables are neatly tucked away. This is great to apply Dynamat, but the metal in that area is solid, you can tap on it and it sounds like a door with tons of Dynamat, zero vibrations.
There is some undercarriage gravel protection and on the inside there's liquid sound deadening.
On the side, between the front fenders and the doors there's a thick piece of foam to block noise.

The trim on the wheel wells (splash guard or mud guard) is just plastic, but it feels heavier and somewhat rubbery compared with the ones on the 406 Coupé. There is no deadening material on them, unlike the ones at the back that have deadening material on top of them.
How to add MLV to the wheel wells
My first idea was to cut a large piece of MLV and place it on the back of the trim, this way it would be easy to keep it in place with the screws and clips.
The problem with that approach was that on top there's only one plastic clip holding it in place and the screws push the trim directly into the fender. To make the MLV reach the top clip I had to cut a large piece, 900g, very heavy to be kept in place with just plastic clips.
This was no good and if one of the plastic clips would fail, the trim could not support that weight and having it rubbing on top of a tire at speed is not safe at all.
So my second idea was to use some screws on the side to keep the MLV in place, plus some zip ties at the top mostly for peace of mind and avoid any noises in case the MLV were to break loose.

This also allowed me to use less MLV for the same coverage, I only want to block noise from entering the car, if I were to cover the entire splash guard I would be blocking noise from entering the engine bay, makes no sense. With this approach I was able to save 400g per side and have the MLV fastened
To avoid rattles Dodo Super Liner was added directly to the MLV on places were it could be in contact with metal or the plastic trim.

I also added some Dodo Super Liner on the wheel wells, this will block some of the noise and decouple the MLV, avoiding additional noises.


The MLV is now blocking noise in the areas that were not covered before while deadening the floor so it extends behind the tire, going the full width of the splash guard.
With the trim back the MLV stays firmly in place, so I have peace of mind that it will not fall off while driving.
The results
So, in total I've added another kilogram to the car, but with the quantity of small rocks, leafs and sticks that have fallen off once the trim was removed, I think I've saved a few grams there.
I went to test the car and my first impression was not good, I couldn't hear any difference, but the car is already very quiet.
Once I got into the motorway I found it to be quieter, there is less rolling noise and indeed the dB meter confirmed it. I took a new measurement before doing this and I got a reduction of half a decibel both at 80km/h and 120km/h. I found that weird as at 120km/h wind noise is the most prominent thing I ear, but the meter did show a reduction. I guess since it's a lower frequency it's not as irritating to my ears, but does increase the noise level.
I didn't think it would make a big difference with the Ampera already having the floor completely deadened, but it did improve the quietness on board.
I'm not going to do the same thing on the ones at the rear, the trim already has deadening, I did add more deadening on the rear quarters and the seats also absorb noise.
Now I don't know if I should call the project done, It's already very quiet and there's little to be done to improve it, but who knows.
Done in 20 of December, 2020