Deadening on the roof
This one was fun. My idea with deadening the roof was to reduce noise from the rain and block heat from the summer sun. Turns out I managed to reduce a lot of wind noise and the car interior noise levels are now bellow 60dB(A)! The sound meter now registers the same value at 120km/h in the Ampera as the C6 did at 80km/h. Noise perception is another story, but I'll get to it.
This was done in the course of two days. The main issue was taking things apart and put everything back in place. Since the roof is a straight sheet of metal it's quite easy to deaden.
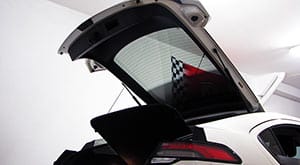
Taking the headliner out and assessing what to do
Almost every time I talk about sound deadening with someone the main question they ask is how do I know how to remove the inner trim and what goes where.
Cars are built very similarly to one another so you get a general grasp of how things work. But for every car that I deadened I always used the workshop manual that is found usually in the owners club forums or some other websites of the type. The manual for the Ampera / Volt is very vague at times, but still helps a bit.

In the workshop manual you are supposed to remove the sun visors by disconnecting the electrical wire. What they failed to mention is that the wire and the connector are glued to the headliner and the connector is 10 centimeters into the headliner.
So if you have an Ampera or Volt and want to remove the headliner here are my tips.
Keep the sun visors in place, just remove the 3 screws that hold the visors to the roof and the visor support where it latches on the center of the car. The wiring loom on the A pillar needs to come out, you have to disconnect two connectors at the A pillar base and pull the cable out. At the back don't try to remove the two clips in the roof unless you will replace them. You will damage the clips, just ease the headliner down at the front and you will get enough slack to place a trim remover tool between the top of the headliner and the roof. It's also easier to fully remove the plastic piece that is fixed in the windshield. Just push it upwards and all the sensors will come out as one.
When it's time to put the headliner back in place put the seats back in their normal position and gently put the headliner on top of the headrests. Start by putting the headliner back in place at the front with two screws on each sun visor and then the center and rear magnets will hold the rest of the weight. Use the rubber seals to fix the headliner in place and you are done.
Also when I'm deadening some areas of the car I wash it and make sure everything is clean. If for some reason you where to touch a metal part with trim you don't run the risk of making it dirty. This is particularly true with a headliner that is usually a light colour and doesn't like to be cleaned regularly as it might sag. Also using clean microfiber gloves is a must in every trim part that has fabric since it's harder to clean, avoids dirt and oils from the hands to pass to the trim piece.
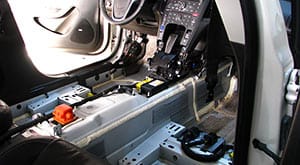
Now, back to the deadening. To take the headliner out It's necessary to remove the upper trim of all pillars, the roof console and rear lights.

The headliner is very light, has magnets to keep itself in place (very clever) and the heavier part is at the front with the supports for the roof console and the sun visors. There are also four energy-absorbing blocks that are already decoupled. All the wiring is glued in place and uses fabric looming, so no risk of noise from there.

Not so clever, to remove the trim pieces to get to the headliner you need a 7mm, 8mm and 10mm socket and a Torx 10. It boggles my mind, why not use the same type of screw everywhere? I'm sure it would make things much more efficient at the assembly line. In the 406 Coupé and C6 almost everything was a Torx 20, with the exception of things that need more torque like the luggage net retainers that used bigger screws.
Anyway, rant over. Back to the headliner, there's a lot of space between the headliner and the roof, with the exception of the four foam blocks so there would be no issues with the 6mm of the Dodo Super Liner.
Looking at the roof there was just two support beams that are already decoupled and the panels were completely straight. The side of the roof is occupied by the curtain airbag and nothing can be done there.

From factory there are 4 CLD tiles in place but the glue isn't very good as they are falling down. I usually leave all deadening in place and just add Dynamat on top or leave it if it works ok. This time I had to remove those tiles.

So the plan was to remove the tiles, apply Dynamat Extreme in the entire roof and then Dodo Super Liner on top of it. The hollow areas at the front and at the back of the roof were going to be filled with polyethylene foam.
Reduce resonance with Dynamat Extreme
I wen't for full coverage on the roof. I noticed that while removing the old CLD tiles that the roof flexed a bit. This means the metal is very thin so there will be resonance and little heat blocking. The support beams didn't need much Dynamat as they are sturdy and don't vibrate.
At the front and the back of the roof I just added some Dynamat to stop the metal resonance as these areas would be filled with polyethylene foam and it would block some heat already.


Blocking heat with Dodo Super Liner
The roof of the car is one of the main areas where heat enters the cabin in the hot summer sun, also one of the places where heat escapes on the cold winters.
Dodo Super Liner acts as a thermal insulator fixing these issues. To avoid any problems with putting the headliner back in place I used Dynaliner 1/8" where the foam blocks are, it's half the thickness of Dodo Super Liner.
At the back and the front areas I've only used Dodo Super Liner for decoupling to avoid any possible rattles.


And now the results
Everything went back into it's place without any issues or space constraints. As usual the car looks unmodified, everything is hidden and you can't see any deadening material.

I've added quite a bit of weight, 1.9Kg of Dynamat Extreme and 400g of Dodo Liner, Dynaliner and the foam. I've removed 300g of deadening material so it was 2Kg added. A bit much since it's in the roof and it messes with the center of gravity.
But the results are great! The wind noise has reduced a bit. At 80km/h the meter oscillates between 55.5 and 56, so about a 1dB reduction. At 120km/h I now got 59dB, another 1dB reduction.
I wasn't expecting much, maybe half a decibel at 120km/h but it's better than that. This means the Ampera now has the same noise level at 120km/h as another stock Ampera at 80km/h.
It's very quiet inside, a pleasure to drive.
Now there is only the floor, kick panels and firewall to deaden. I will definitely do the floor and kick panels. Will need to assess how much deadening material I still have and if I need to order some more. After that maybe I will revisit the doors, but I think I can only reduce rolling noise now.
Even if the noise levels are reducing, as I have written before, the main issue is the windows. That's where most of the noise enters and there isn't much I can do about it. The HVAC system is also the noisiest thing inside, you can hear the air flowing but that's just physics, nothing I can do about that. In an old Rolls Royce they say you can only hear the clock, in the Ampera you can only hear the HVAC!
Done in 8 of February, 2019