Rear hatch door
When it's raining hard and I'm stopped in traffic there is a lot of noise from the rear. The culprit seems to be the top area of the rear hatch door where it meets the roof. When you hit that part it sounds like it's made of tin. The roof on the other hand sounds very solid, just like on the 406 after deadening.
The rear hatch door has little to no metal area exposed, it's mostly glass. Even the spoiler is made of plastic and is detached from the metal frame. So my main concerns are reducing the noise from the rain and block heat under the spoiler since it's a large horizontal surface as the bulk of the noise will enter thru the glass.
Taking things apart
It's quite easy to remove all the trim pieces, it's just a question of using a trim panel remover and pull, everything is hold in place with plastic retainers, only two screws hold the hatch handle that we use to close it.
Funny thing, the screws are Phillips heads. I thought that by now every car manufacturer was using Torx, but it's an American made car so...


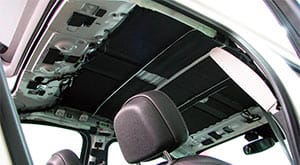
After removing everything I was impressed by how little space available there was to add Dynamat on the top part of the hatch. In hindsight, there is a lot of metal exposed in that area, but I was thinking there would be access to the outer skin of the panel.

There is some deadening material under the plastic trim, only the lower part doesn't have anything, but it's quite heavy. Forgot to see how heavy it was, but almost as heavy as a rear door trim panel. Impressive!
Polyethylene foam to the rescue
Since there is no space to add Dynamat to the outer skin I filled the top part of the hatch with polyethylene foam. I've used this before in the 406 Coupé roof with good results. It's a very lightweight material, doesn't absorb water and has some acoustic proprieties, specially with impact noises.
The noise from the rain is an impact noise on that area, so coupled with Dynamat might help make it quieter on rainy days.

It was very time consuming as there is only that little access hole to feed the cables to the third brake light, rear lock and window defroster.
Dynamat Extreme
Since there was almost no space I tried to add as much Dynamat Extreme as possible without interfering with the space near the holes for the trim retainers. As you can see in the pictures there was not much space available on the top part of the hatch, but I was still able to add enough Dynamat to make a difference.


In the rear end of the panel I had a bit more space, but the metal is somewhat reinforced there as sounds solid enough. Still, since I was not going to add MLV I tried to apply as much Dynamat as possible to try and reduce even further any noise that might enter the cabin from the back.


I almost forgot to take pictures of this step, this is why you can already see some Dynaliner in there. Spoiler alert I guess?
Dynaliner 1/4"
Instead of using Dodo Super Liner I used some Dynaliner 1/4" that I still had left from the deadening on the Citroën C6. The idea was not only decouple the plastic trim to avoid rattles but to block heat under the spoiler, since it's an horizontal panel and they get the hottest under the sun.
So I did full coverage under the spoiler and in specific places in the rest of the hatch just to decouple. The rear glass is tinted and already rejects a lot of heat.


End result
As always, the picture with everything back in place.

The lower part of the bottom trim is a pain to put back in place. It comes out as one solid piece, but then needs to be put back separated. The problem is there are so many clips in the bottom part that they tend to jump out of place. So I had to remove it and try again and again.
In terms of weight added only 400g of Dynamat Extreme and approximately 150g of Dynaliner. I didn't even account for the polyethylene foam.
As for the results, I wasn't expecting any reduction in noise at speed, but I have been wrong before. So I went and measure the noise and it's about the same as before. Makes sense, my only issue with noise in that area was with the rain.
About the rain, we had about 2 months with little to no rain in Lisbon, while I was deadening this area it rained a lot. When I had everything back in place and I could go out and test the car, the rain has stopped. Also the forecast for the next 10 days is no rain, so I have to wait. I might update this article when it rains.
Next step will be the roof.
Finally, heavy rain! (Article update)
Finally we had heavy rain and I was driving so I could see if it did reduce the noise. And yes, it did work. Not perfect, but much better than it was. It no longer sounds like it's hailing on the rear hatch door while it rains in the rest of the car. Very pleased with the result.
Done in 19 of January, 2019