Front doors with MLV
I always wanted to add MLV to a car. In the C6 I didn't do it because the shipping was prohibitively expensive, but now the Sound Deadening Shop has a fixed lower shipping price to Portugal so I ordered some.
The brand is Dodo Mat, so I got some Dodo Barrier MLV and instead of Dynaliner I opted for the Dodo Super Liner as it is not as expensive.
I also ordered a Dynamat Extreme bulk pack and still have some Dynamat and Dynaliner that I didn't use in the C6.
The idea is to use Dynamat to add mass to the panels to make them stop resonating, use the Super Liner or Dynaliner as a decoupler to the MLV or plastic pieces and as a heat shield, and finally MLV as a pure sound barrier.

Unlike Dynamat that is very light compared and easy to apply (peel and stick), MLV is very heavy, needs to be cut in one piece because layering is a nightmare and you can't just glue it in place because it needs to cover the entire area.
Before placing the order, some tests
Before ordering the material I first removed the drivers door card. I was keen on ordering the Dodo Sound Stopper LT, it has two layers of foam, 6mm each, that decouples the MLV layer, 2mm. 14mm in total.
Not sure if it would fit I cut multiple layers of polyethylene foam to make it 14mm thick and placed it between the door and the door card. It didn't fit!
Then I tough about the Dodo Pro Barrier MLV, only has one layer of foam and is 8mm thick. In some places it didn't fit either. So I ordered separately the MLV and foam to be able to make it fit. So remember, before ordering deadening material that is thick, make sure you have the room for it.
This will also be my first deadened car that will not have new clips / retainers in the door cards. Each clip costs more than 4 Euro! For one door only I would have to pay almost 50 Euro! On the C6 were the clip is made of two separate pieces and has foam decoupling it I bought clips for all four doors for less than 20 Euro. Since I have some left I will be using them in case some of the original clips get broken.
The front doors
I have written before about how GM did a great job making the car quiet and after taking the door card out and examining the interior I know why. Every single hole is blocked with either a rubber grommet or a rubberized fabric with butyl gluing it in place.
The outer door panel has deadening mats in strategic places and even the crash structure is decoupled. I seriously think I might have bought too much deadening material, or probably bought enough to deaden the entire car.
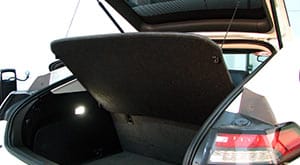
So, first let's take a look at the door card.

The entire door gets decoupled with that piece of deadening material that also blocks heat. The car is white so it radiates heat instead of absorbing it, but the interior is black so it still gets warm inside.

As you can see in the image above every hole is plugged. This makes a lot of sense. For example, at home if you have noise on another room there is a big difference if you close the door or just leave it a tiny bit open, a lot of noise enters from there. The principle here is the same, blocking noise.
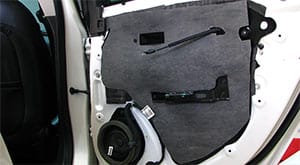
The door sealing sheet is also made of a rubberized material that keeps the water out and also blocks noise. It is also glued in place with butyl making it a good decoupler for the MLV.
Taking the door seal out there isn't much space to put material in, but there is quite a lot of deadening material visible.


Methodology and analyzing the previous test
Unlike before were I would do an entire door at a time, I did both doors at the same time. I would take pictures and use them as guides to where to apply deadening material, but then you would never know the right size of piece of Dynamat to cut and I would waste a lot of time.
It's easier to take a picture of the door assembled to look at if some doubts arise. This way I could look at the other door and use it as a template.
Also this way I could get the foam I used before as a test, check the pressure points on the foam and use it as a coarse template for the MLV and were to avoid applying too much Dodo Super Liner.

As you can see I had to remove a lot of foam for the door card to fit, but we will get to that part later.
First step, Dynamat
As I wrote before the car is already well deadened. The door has a nice solid thump when closing and I want to avoid adding too much unnecessary weight to the car.
My idea is to give the door some extra mass to make the metal sound as solid as possible and improve the sound quality a bit. So behind the speaker I applied a large piece of Dynamat and then some smaller pieces spread around where I would tap the metal and felt it could have less resonance.
Also on the window elevator guides Dynamat was applied to avoid that, without deadening, these pieces would then vibrate as the rest of the door was solid.


To help reduce rolling noise entering the door and messing with the sound quality Dynamat Extreme was also applied in the lower and front part of the door. These areas are near the front wheels and this will help, as rolling and wind noise are the main culprits in terms of noise with the Ampera, since there is no engine to make noise.

As you can see I have applied minimal amounts of Dynamat as there was no need to add more. Sure, I would have an improvement if I would go to near 100% coverage, but since I was going to add MLV to act as a noise barrier Dynamat is only used for resonance control.
In the inner door skin the same method, just add Dynamat were needed.

And since the Ampera doesn't have frameless doors, Dynamat was added on the window frame to make it sturdier


Fitting the MLV
MLV is really heavy, it's not very malleable and doesn't compress. Qualities to make it a great sound barrier, but a pain to work with.
I first put the door card on top the MLV and traced it's contours to have a rough shape to cut. Then I pressed it into place inside the door card itself to mark where the door card clips were.
This makes it easier to start cutting holes for the cables, speakers, screws and so on as now there are reference points.

After that I tested it on the door itself, made some adjustments and it looked like an almost perfect fit.

I tried the door card on top and there where no apparent issues so I started the decoupling process with the Dodo Super Liner. The the problems arose. There was no space in some areas, I had to cut a lot of MLV and remove some Dodo Super Liner to get the door card to fit.
Also in the middle of the door there is an inward indentation made in the door card to carry a water bottle. Remember when I said that MLV doesn't compress? It was a pain to try and make the door card get back in place. I tried some strategic cuts and removing bits and pieces.
In the end I had to remove a lot of MLV as there was simply not enough space for the door card to get back in place. This is what I ended up with, not very happy because MLV works best when the entire area is covered.

Still the door felt quite heavy and closing make it sound like a bank vault, just like with the 406. So I used the piece of MLV to trace a negative to be used in the drivers door side.
Since things weren't going according to plan and I was running short on time I didn't take any more pictures, only, as usual, the door card back in place without any deadening material visible when I was done. I added polyethylene foam on the door card for decoupling and some Dynamat to avoid rattles but didn't take any pictures.

About Dodo Mat and these new products
I've never used MLV before so I don't have a term of comparison with other types of MLV, but it feels heavy. It's easy to cut if you have good scissors or a good x-acto knife. It's a pain to keep in place because it's so heavy. Strong adhesive is necessary, and lots of it!
Regarding the Super Liner versus Dynaliner, it feels almost identical, it has a more active smell but I'm sure it will go away just like with Dynaliner. The only issue is with the adhesive, Dynaliner is easier to peel off, but the price difference is something to consider as the Dodo is cheaper.
They are heavy doors now!
So, each door got 500 grams of Dynamat, 100 grams of Super Liner (sounds like a recipe) and 1.9kg of MLV. 2.5kg on each door, 5kg total.
Out of curiosity I weigh each door card without the window and mirror controls and they are 3.6kg each, heavier than the MLV!
The results
The doors feel much heavier and they close with a very satisfying thump.
I was very skeptical if the MLV would work as everywhere I read that you need full coverage, but when I got the car out of the garage it was raining and that makes the rolling noise much more present in the cabin. I can pinpoint now the noise from the front wheels entering the cabin via the footwell and the kick panels. I can also ear much more the rear tires now, so that is confirmation that it is working.
So, lets look at the numbers. At idle the sound meter didn't show any difference, makes sense since the car is electric, so virtually silent and the hood already had Dynamat on it.
At 80km/h before the doors I measured 58.5 dB, now 57.7dB, so I'm going to round it up to 58. Half a decibel is not something to get excited about, but the tests where done just after some heavy rain, so there is some extra rolling noise there. The biggest difference was a 120km/h, before I had 63dB and now 61.9dB, only a one decibel difference, but there were times were the meter would measure 60dB and that is very quiet.
I'm sure if I add MLV to the floor and kick panels I can remove the rolling noise from the front tires almost entirely.
The sound quality also improved, bass is a bit more present. I should have added Super Liner behind the front speakers just to make it sound that little bit smoother, maybe I will revisit that area if I like the results on the rear doors, probably the next area to be deadened.
Done in 14 of October, 2018